
How to Transform a Fine Art Painting with Marbling
- Angela Wrahtz

- Jul 30, 2022
- 5 min read
Updated: Aug 16, 2022
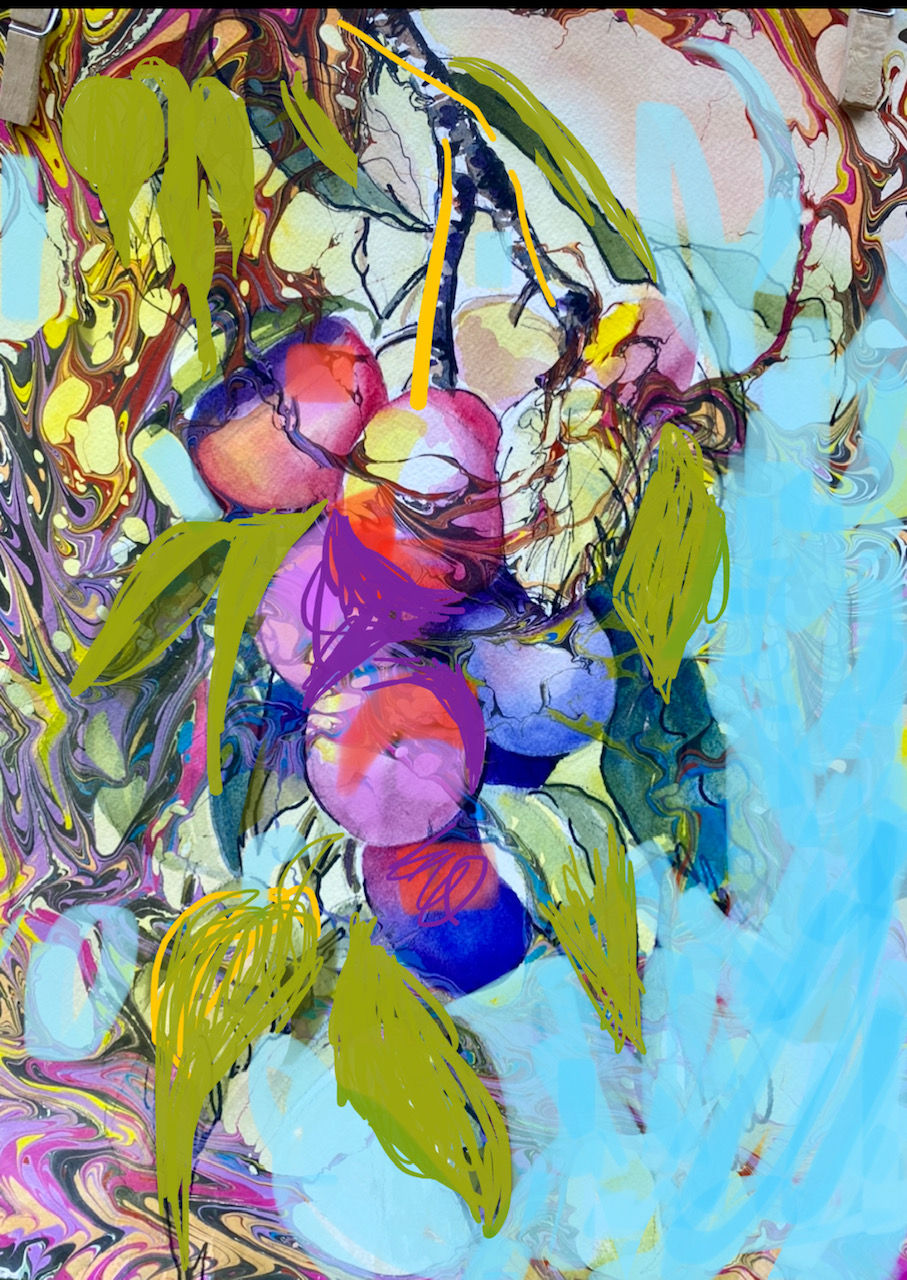
Thanks for loving my plummy marbled painting, “Branch of the Family.” I appreciated the compliments AND the many questions asking how I created such a painting. You wondered, “What are the steps? In what order were the paint and marbling applied?” Some processes lend themselves better to visual de-construction than others. No amount of staring at this one will reveal all my secrets. I’ll give a few here.
First of all, my plum painting started as a simple traditional botanical watercolor painting. I had a photograph of the actual fruit on the vine with interesting patches of reflected light and shadows to start with. I did a free drawing of this picture on my paper. I like to draw, and the overlapping oval shapes were where I started. After that, I loosely sketched in leaf shapes and began to paint. I mostly deploy my M. Graham honey-based professional watercolors. I love their vibrancy and glow. Some may recognize this painting as a demo from a “project” I taught a summer art class via Zoom a couple of years ago. Here is what the resulting painting looked like:

Next, I made cards and shared the painting with family and friends. Then painting stayed on the shelf for a while until I decided to play with it some more… Usually when I do marbling, I put unfinished or failed paintings into the tray to see what happens. Before I do that, I use a fixative to make the painting less likely to dissolve in the wet marbling tray. For the plum painting, I created a design in the marbling tray, broke it and otherwise manipulated it, and then dipped (more precisely said, “printed”) the design on top of my artwork, and voila…

As you can tell from the initial result of marbling, the swirl of colors and random design covered some of the original watercolor painting, and in other places, the original watercolor painting shows through. It’s kind of a glorious mess. Part of the plum painting disappears, pleasingly in some places and annoyingly in others. On the paper is a riot of mixed media madness, color and pattern, and lines and shapes that are intriguing, confusing, and ripe with potential. Time to do the hard part…decide what to keep and what to paint out in the next stage. Before I get to actual paint, I create some digital sketches to help me visualize value changes by painting over parts of the marbling to reduce the noise and bring some order back to the work. Here is a sample of a quick and dirty digital sketch I did on my iPhone with edits I did not ultimately use, but this helped me to rethink my direction. You get the idea.
When I am feeling courageous, I paint again. Not trying to be dramatic here. If you’re reading this, you’re probably a painter, too, and you know there are times when putting the brush to the paper is a little scarier than others. When you paint with oil, you can make changes forever. When you paint with acrylics, there is also great flexibility. When you paint with watercolors, you know you need to be very thoughtful and predictive because you can fix some things but not all. You can lose the glow and vibrancy of a painting by over-painting a watercolor. Frankly, it is very easy to kill a watercolor.
When you marble a watercolor, you are dealing with a new layer of paint whose wonderfulness can be lost with bad decisions. Once you overpaint your marbling, it’s spontaneity is gone forever. If you’re going to paint over marbling, you have to be prepared to let it go forever. I can think myself into a big headache at this stage of the artwork!
So, to get myself moving forward, I begin with “recovery mode,” or restoring part of the watercolor that was lost by too much marbling acting as an opaque drape over the top of it. I look for lost edges to bring back and fix those first. Then inch by inch my confidence grows, and I paint the next thing. Sometimes I add in permanent pen and ink to enhance linework or edges. Sometimes I correct the marbling by restoring a connection where the pattern was too broken. The pattern isn’t the most important thing. The most important thing is all the different parts of the mixed-media artwork working together as a cohesive whole with good composition and arrangement of dark and light values. Here you can see how the shapes of the individual leaves are brought back to better definition and the edges of plums are cleaned up. In this penultimate version, I have not yet made the middle left plum orange yet.

In conclusion, I step back from my work and look at it from a distance as it develops, and I put it aside overnight to get a fresh view in the morning before I decide if I am done. Sometimes I ask an art friend for comment if I am unsure about some aspect of the work. I realize that the character of what is created is different from what it was when it started but I ask myself if the story or message is still there. I rack my brain for a title that suits it, a pithy description to accompany it, and then share. This is the final version I posted on Facebook with the words: "This watercolor painting of plums on the vine took a radical turn when I marbled it and painted more. The fact that all the fruit are not the same color may bother some. This project made me think about family and how one branch can produce a lot of different fruit!"

I’ve been developing my technique with this over a good number of years. I’ve shared my results with my watercolor students who for a good number of years have asked me to offer a workshop and teach them how to do it. I resisted for a long time. I mostly encouraged my students to go to other teachers and to buy Rene Eisenbart’s great book THE ART OF PAINT MARBLING... until this summer when I finally answered the call and began teaching my process of marbling to others.
I’ve been blown away by the results. Most of my students who participated in these workshops had stacks and stacks of watercolor paintings they wanted to experiment with and give new life. I share some of these on my website. It has been such a joyful process that I’ve decided to do more of these workshops in the future and will include information about them at my website. If you would like to be on my subscriber list to receive information about this in the future, just fill in the little form.
Thanks for asking about my work and my process.
Comments